*** Due to obvious constraints brought on by the COVID-19 pandemic, some additionnal production delays may occur. We are doing our very best to limit these delays to a minimum ***

FAQ
When I upload my artwork, why won't it center?
Remove any strays from the file and make sure it isn't larger than it needs to be. It should be the final size PLUS bleed (1/8"). Also, flattening your artwork can help.
The dimensions I'm looking for aren't on the list. What do I do?
If you would like to place an order for a size that is not listed on the website, you can still place an order online. Select the size that's closest to your desired final size WITHOUT selecting a size that's smaller than your document. Once the order is placed, do not send the files in right away. Contact us first, ideally by email (support@presseflo.com), with your order number and the final size you would like. We will change the dimensions of your order, so that you can upload your files.
The upload page isn't working, what do I do?
If you're having difficulties sending your files, you can try these steps:
- use a different browser
- update browser + scripts (Java, Flash, etc)
- reboot your computer
- clear cache/cookies
- check to ensure that the specs of the files you are sending are correct (size, bleed, cmyk, transparency, etc)
If the problems persist, please get in touch with us.
I want to place more than one order and ship all to the same address. How can I save in shipping fees?
Add all orders to the cart before doing the checkout. This way there will be one combined shipping fee. Please note that adding an order to your cart with a longer production time will increase the time before all orders ship.
How do I prepare files for Spot UV orders?
Follow these guidelines:
- The UV and design files must be separate and in four different files
- Send one file, with only one layer for the design of the recto
- Send one file, with only one layer for the design of the verso
- Send one file, with only one layer for the UV of the recto
- Send one file, with only one layer for the UV of the verso
- If the spot UV is only on one side, then specify which side in the comment box (when placing your order)
- what is in spot UV must be 100% opacity and only 100% black, and not a combination of colors
- all four files must be the same size, so if bleed is 1/8", business cards would be 2.125"x3.625" so all four files should be this size,
- In the design, be sure to use CMYK unless you paid for Pantones
When sending the files, send the design of the recto and the verso in the section that asks for the "front" and "back". Send the UV files in the section "additional files".
- To avoid any issues please make your line thickness min 1pt
- We do not recommend tight register with spot UV layers. The spot UV layer may move up to 1/16".
How do I prepare files for rollup banners? Follow these steps:
- Add 1/4" bleed along the top and the sides of the banner
- The banner must be 33" x 81" + bleed
- Avoid putting text in the bottom 3", in order to make sure it doesn't end up within the base of the stand once installed
How can I check my PDF for errors?
Open your PDF in Adobe Acrobat (not the reader software). Depending on your version of Acrobat, these steps may vary. Go to Tools > Print Production > Preflight. Once you click "preflight", a window will open and on the bottom right end you will see the button "Analyze". Click on "analyse" and you will see a list of errors with your document.
How can I split my PDFs (from multiple pages to individual pages)?
You can visit www.splitpdf.com. This is an online tool to help you separate your PDF files.
What is the difference of the types of upload/prepress services Hueneye offers?
Assisted File Upload: We can upload your files for you
Professional Artwork Check: We will look through your files for common printing errors.
Ship me Samples: We will ship your order to your client, and ten samples of that order to you.
No proof run as is: Your files are ready and can go straight to print.
PDF proof (file-check only)$: You would like a PDF proof. Your order will go into production after the PDF is approved.
PDF proof (file-check+layout+folding)$: You would like a PDF proof of an order that has folds. We will take a close look at the location of the folds before sending you a PDF. Your order will go into production after the PDF is approved.
Epson proof $: You would like a hard-copy (printed) proof. Your order will go into production after the Epson is approved.
Printing 101
Laying out your document
The outer edge of the artwork is considered a “safety area” that is utilized for cutting. No important images or text should be placed within this area. Although an 1/8 of inch is the minimum, we strongly recommend you use a 1/4 inch (.25). Here is an example of the correct way to submit your files:
| Correctly submitted artwork | Correctly submitted artwork after cutting |
 |
 |
Keep your type in!
This is an example of how the same file can be submitted incorrectly. If you notice, the file was designed with all of the type and important graphics right up to the edge of the canvas. This results in the cutting of logos, fonts, and important graphics. This is an example of how NOT to submit your files:
| Incorrectly submitted artwork | Incorrectly submitted artwork after cutting |
 |
 |
Remember
As with any “gang-run” printing company there is a slight variation when cutting your jobs. We do not guarantee jobs wth borders on them. These jobs will come out uneven.
File Specifications
Before sending in your digital files, please review the following specifications. If you are unsure about the specifications please do not hesitate to contact our pre-press department prior to sending your file.
Adobe Illustrator
Save file as an EPS Format, images should be embedded, and fonts should be converted to outlines.
Adobe Photoshop
Your Photoshop files should be flattened and saved as TIF document. Please make sure that your document is in CMYK colour format and at a resolution of at least 300 dpi.
PDF Format
We only accept PFD files that have been saved as a postscript file from your native program first, then "distilled" using Acrobat Distiller using PRESS setting. PDF X1, Please check "OVERPRINT PREVIEW" in Adobe Acrobat.
Fonts
All fonts used must be supplied. Both printer and screen fonts must be included. Postscript fonts yield industry standard results. Alternatively all fonts can be converted to outlines.
Scanning
All scanned images should be of a professional standard. Scanned images need to be saved at an appropriate resolution of 300 dpi for continuous tone reproduction (photos and/or illustrations). Photos or scans should always be saved as CMYK and saved in tif format.
Bleed
When we quote a print size, it is for that specific image area, please make bleeds inward (al teat .125") unless other wise specified, if you are bleeding outward please include bleed when requesting quote. We need .125 of bleed so if your order is for a 3.5X2 business card, we need 3.625X2.125.
Colours
All colours in your document must be CMYK if you use spot colours in your design please convert them to cmyk before saving, duotone images must also be converted to cmyk. Colour is printed to Hueneye Communications Inc. standards, i.e. pleasing colour. Exact colour match not guaranteed. Critical colour requires a colour key or match print. Colour laser copies or other proofs are not considered accurate prepress proofs.
We are limited maximum ink coverage of 300%, anything over may result in many print related problems such as cracking or offsstting To achieve a rich black, we will recommend the values C30, M30, Y30, 100k Orders with solid blacks with only C0,M0,Y0,K100 will not print fully black.
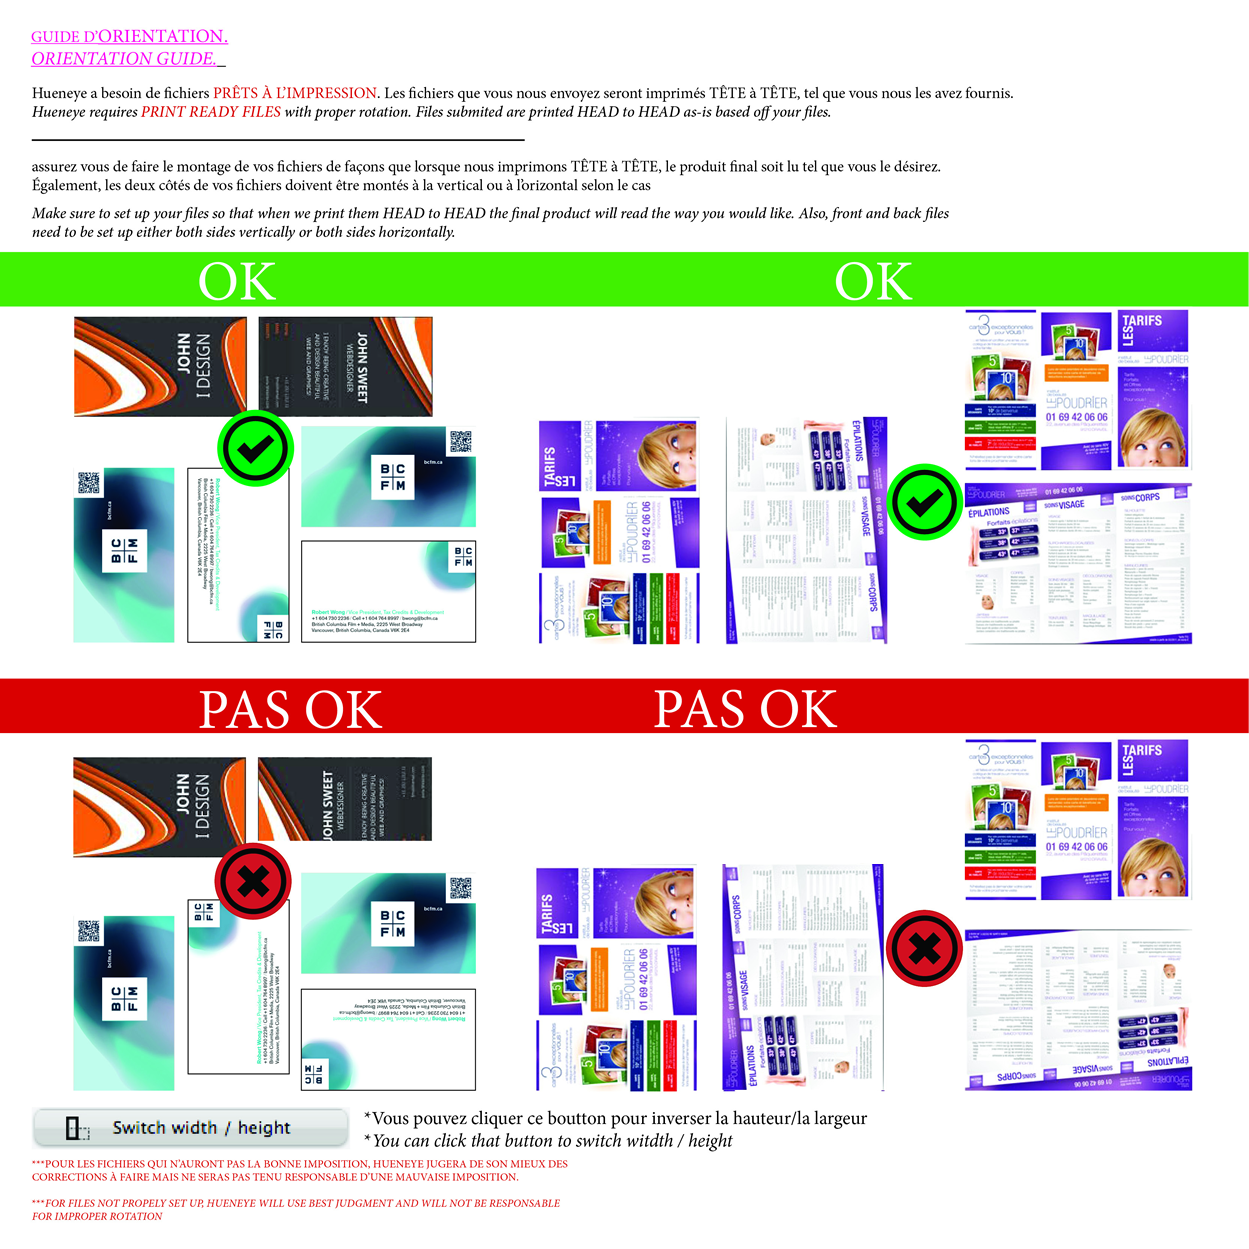
Upload guide
Click here to view our upload guide